You can also be interested in these:
- Asus Zenbook Flip 15 Q538EI review
- Asus X540S laptop review
- Asus Zenbook 14 Flip OLED laptop full review
- How to factory reset your Asus router
When it comes to replacing a hard drive, laptops can be surprisingly tough to deal with, like with the Asus Q302L. Now don’t get us wrong, swapping out a hard drive is fairly basic procedure, but within the confined spaces of a laptop, it’s easy to get things wrong by pure accident. This is why many users simply have their laptops sent to stores to get them fixed, it’s a lot more convenient that way.
But, what if you’d much prefer to do it yourself? In this case, don’t worry, we’ve got you covered. We’ll take you through every step of the process, starting from opening your device up, all the way to installing your brand new hard drive. Once you’re done with this guide, you’ll be able to swap out storage drives on the Asus Q302L like a champ! So, let’s get straight into it.
Step 1: Choose your new hard drive
Before you start prying open your device, first you’ll want to make sure you actually have a hard drive worth upgrading to. The Asus Q302L features a 2.5-inch SATA storage drive, so make sure any drive you buy fits those specifications. Really consider your budget, and then levy that against what you’re aiming for when buying a hard drive.
If you want more space at a not too expensive price, you’ll want a 7200rpm decent quality SATA HDD. They’re cheap nowadays, and they offer quite a lot of storage for fairly low prices. If what you want is straight up speed though, then a SATA SSD is the way to go. Not only do SSDs run completely silent, but they’re also just blatantly faster in every way.
Regardless of what choice you make, you’ve now gotten yourself a new hard drive! Give yourself a little pat on the back. Now that you’ve finished the first step, you can move on to the next one, preparing for yourself tools before you start.
Step 2: Preparing your tools
Never blindly charge into a laptop repair with makeshift tools! Laptops like the Asus Q302L are delicate pieces of machinery, where any wrong tool can ruin an internal and break the laptop forever. So, we’d preferably like to avoid that by making getting all the proper tools for something like this.
Thankfully, even among standard laptops, the Asus Q302L is surprisingly easy to open up. First you’ll need a Phillips #0 Screwdriver, in order to remove screws from the chassis of the laptop. Other than that, all you really need is an opening tool that can pry open the bottom panel. There are specific tools for this, but you can also settle for a guitar pick or a particularly tough card.
When you’ve gotten both of these things, you’re all set to pop your laptop open and start making the necessary changes! If this is you, then now’s the time to take a deep breath and move on to the next step in our list.
Step 3: Remove the bottom panel
Alright, place the laptop on the ground with its bottom panel facing up. Using your screwdriver, remove all 10 screws keeping the bottom panel secure and store them in a safe place. Then, grab your opening tool and slowly pry open the laptop from every angle possible. Be gentle, all you’re doing is slowly unfastening the clips that hold the panel down, you’re not trying to rip it off.
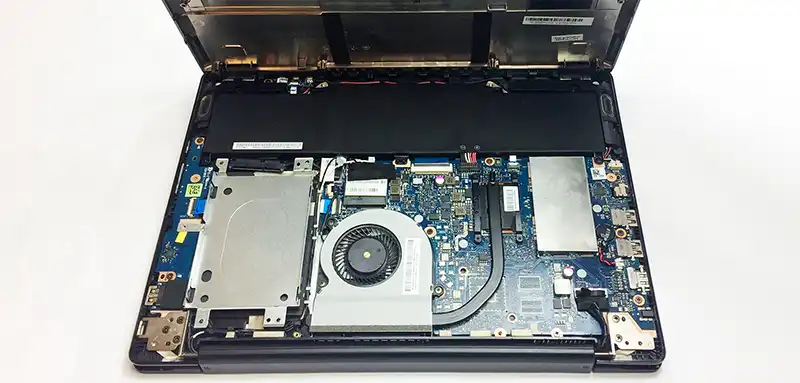
With time and a bit of effort, the bottom panel should pop straight off without too much resistance. You’ll now have access to the Asus Q302L’s internals. Take the bottom panel and place it somewhere that’s accessible but out of the way. Then, continue on to our next step.
Step 4: Remove the battery
Next up, you need to remove the battery. It covers the hard drive, so getting it out is the logical next step. Take your screwdriver once again, and carefully remove all 5 screws that keep the battery in place. Make sure to place the screws somewhere safe, you don’t want to lose them and leave your battery wobbling around in its place.
Grab your opening tool, and gently wedge it under the battery’s connector. Make sure to only pry on the connector, and not the socket itself. Fiddling with the motherboard and damaging its socket can result in the whole laptop becoming unusable. We cannot stress this enough, please be gentle with your electronics.
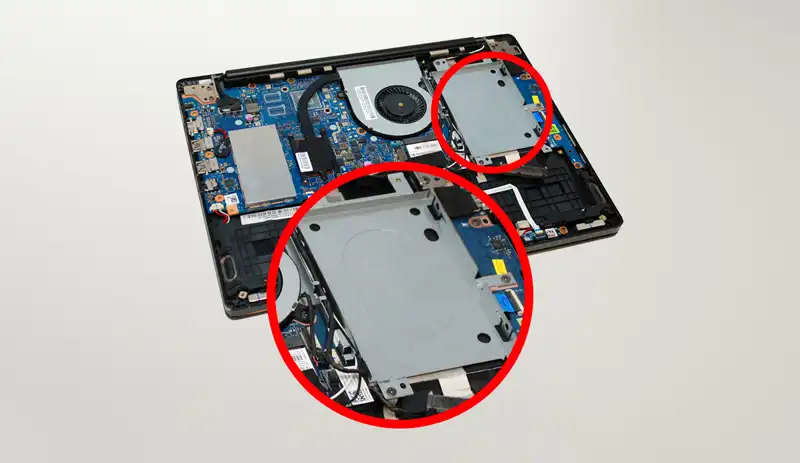
Lift the connector away from the socket while you pry I off, and you should be able to disconnect it just fine. From here, the hard drive should be exposed now. You’re close to your goal, all that’s left is the final stretch and clean up, so move to the next step.
Step 5: Swap out your hard drive and reassemble your laptop
This is pretty self-explanatory. Once more, get your trusty screwdriver and remove all four screws connecting the hard drive to its mounting board. It’ll come straight out without any resistance after that. From here, just put in your new hard drive, and screw it back into place. The same applies to every part before this, just put it in place and screw it back in.
Remember to be careful, especially when it comes to the slotting the battery back in. Once you’ve successfully screwed the bottom panel back on, you’re basically done! Try to turn your Asus Q302L on and see if it works. If it runs fine, then give yourself a little pat on the back. If it doesn’t, then retrace your steps and see if you went wrong anywhere, or simply redo the whole process again.
Conclusion
Swapping out hard drives is some of the more basic stuff in the world of computers, and it’s a good way to train yourself to be delicate around computer internals. We hope this guide helped you pull of your own hard drive swap, and ideally from now on you’ll be able to open other laptops up yourself like a champ. For now though, enjoy your new hard drive, and have fun!
More stories like this
- Asus Zenbook Flip 15 Q538EI review
- Asus X540S laptop review
- Asus Zenbook 14 Flip OLED laptop full review
- How to factory reset your Asus router
- What are OP and Opal technologies on SSDs?
- How to take a screenshot on a Lenovo laptop