You can also be interested in these:
- Razer Stream Controller X full review
- Asus Zenbook Flip 15 Q538EI review
- Is your new laptop second hand? Let’s find out
- How to replace the hard drive on an Asus Q302L
Razer is a company that’s well known for their vast array of gaming equipment. Between their wide range of gaming mice to their popular and clicky mechanical gaming keyboards, basically any gamer worth their salt knows about Razer. This premium privilege also extends to the company’s gaming laptop offerings, with the hero of the line-up being the Razer Blade 15 2018 H2.
Distinguishing itself from its gaming laptop competitors is a key factor to the Razer Blade’s success. Instead of leaning towards the gaudier looks that many competitors go for, Razer have instead chosen to make a slim and sleek gaming machine. It still maintains its great power and strong performance like other gaming laptops, it’s simply a lot cleaner looking than most.

People were enamored by the laptop’s design and flocked in droves to purchase them. Now though, some minor issues have begun to arise amongst Razer Blade 15 2018 H2 users. As with many gaming laptops, heat can be an issue, but some users have been reporting heat that goes way over the recommended running temperate. Today, we’ll be addressing why that is, and how you can fix it.
Why does the Razer Blade 15 2018 H2 overheat?
Typically, laptops heat up because their internals aren’t managed well, or their airflow is lacking. These however simply cannot be the case with the Razer Blade 15 2018 H2. As one of the premier gaming laptops from a well-established company, it’s basically guaranteed that everything here is thoroughly thought out.
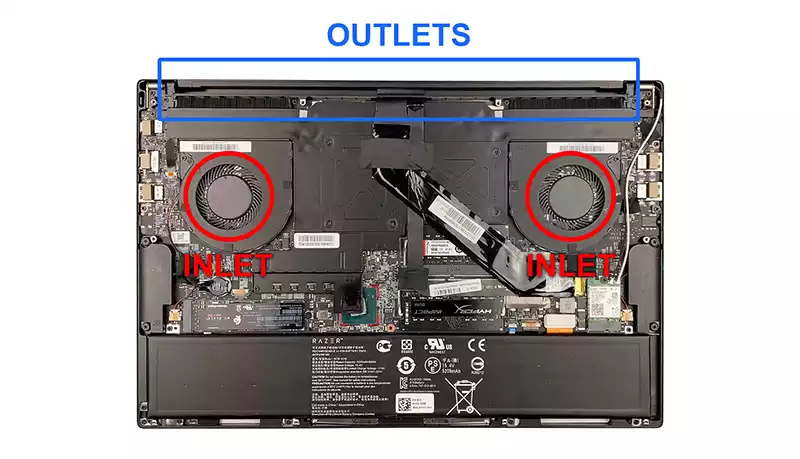
When it comes to airflow, the laptop features to big intake vents at the bottom that suck cold air into the device for cooling. Meanwhile over at the back, we have a huge vent that blows out hot air from the internals of the laptop. In testing, both of these vents worked perfectly fine, with no overheating detected even during long and graphically intense sessions of gaming.
Moving over to the laptop’s internals, everything here is immaculately built and well arranged. You’re not finding any shoddy construction here, every internal is screwed on tight and given ample breathing room. It makes the chances of internals being the problem basically nil. So, what’s the reason then? Surely, the laptops aren’t just overheating out of nowhere, right?
Thankfully, we do have two culprits, which has proven to be the source time and time again, and that’s the CPU’s thermal paste and ventilation clogging. Thermal paste is essential in laptops as it keeps the heat generated by CPUs heading to the vents. Without it, the CPU has nowhere to dispense its accumulated heat. This is common in high performing devices, as their thermal paste dries up completely after a while.
When it comes to ventilation clogging on the other hand, things are far simpler. After a while of not cleaning out your laptop, dust naturally accumulates near the vents. This limits the amount of air that goes in and out of your device, and thus keeps things running hotter than So, now that we’ve identified the problem, what do we do to alleviate it?
Cleaning out the vents on the Razer Blade 15 2018 H2
Alright, this first method will come as no surprise to those of you who are used to cleaning out your PCs. After all, cleaning out your PC and cleaning out a gaming laptop are fairly similar. With the Razer Blade, the process is about the same as with any laptop, so if you have experience with cleaning laptop airflow vents, you’re in luck.
Now before you do all this, check if your laptop still has warranty. If it does, then it’s far better for your to just take it for a little service instead. Opening up your laptop to clean it will void its warranty, and nobody wants that, right? It may take a bit longer than the DIY method, but it’s a lot safer too. If you don’t have warranty or are just stubborn, then keep reading.
First, remove the screws that hold the bottom panel in place. Carefully pry off the bottom panel and identify where the air flow vents sit, both for input and output. Then, get yourself a can of compressed air and blast the sections that are caked with towards the outside. Dust should go flying out, now finish up with an anti-static brush for clean vents and good airflow once more.
Replacing the thermal paste on the Razer Blade 15 2018 H2
So you’re planning to change your thermal paste because it’s all dried up? That’s admirable, but do keep in mind it’s a risky and tough process, so you might still want to take it to a professional. If you’re confident though, carry on with removing the bottom panel. Carefully unplug your radiator and fans from the motherboard and keep them aside.
Give the internals a gentle brushing with your anti-static brush, and then begin peeling off any layers of protective tape available. Begin unscrewing the copper heat sink protecting the CPU and GPU, and once removed will reveal both parts. From here, get isopropyl alcohol and dip a wipe in it, use this to wipe away any leftovers dry thermal paste on your CPU and GPU.
After all the cleaning is done, it’s simply a matter of reapplying thermal paste. This is the simplest part, just squeeze out a rice sized grain of thermal paste on both parts, and then begin reassembling everything. If you found any part of this hard to follow, keep in mind there are many videos on Youtube covering this specific topic. They’ll give you a better idea of what to expect.
Conclusion
While cleaning out your laptop and switching out its thermal paste aren’t the most difficult things in the world, do be careful doing them. Your Razer Blade 15 2018 H2 is a delicate piece of machinery, one wrong thing and it could be toast for life. If you’re not confident, seek out professional help. It’s much better to pay a small premium than to accidentally ruin your expensive gaming laptop. Otherwise though, have fun!
More stories like this
- Razer Stream Controller X full review
- Asus Zenbook Flip 15 Q538EI review
- Is your new laptop second hand? Let’s find out
- How to replace the hard drive on an Asus Q302L
- Asus X540S laptop review
- How to take a screenshot on a Lenovo laptop